Getting Started with Self-Service Workflows
)
Simplifying the Process of Calling GitHub Reusable Workflows
)
July 22, 2025
One of the key features of our platform is Self-Service. In particular, the ability to empower developers to execute a diverse set of tasks independently. In my previous roles at IBM and BoxBoat, we would build bespoke workflows to deploy cloud infrastructure, rollback applications, or even integrate with 3rd party systems. Unfortunately, this automation rarely made its way to the average user. A few developers got to use it, but most people didn't even know it existed.
CodeCargo makes creating and sharing these automations incredibly easy. This is important because most enterprises accomplish this via TicketOps. A simple change like getting a dev VM for 1 hour might take 3-4 weeks as the ticket ping pongs between various support teams.
CodeCargo lets you do that in seconds.
What is a Self-Service Workflow?
Simply put, a Self-Service Workflow (or SSW for short) is an abstraction on top of GitHub Reusable Workflows and GitHub Dispatchable Workflows. It makes executing your GitHub Reusable Workflows very easy. We also provide a mechanism to fine-tune inputs with static values or dropdown lists of different options. This lets you provide compliance and governance to your teams to make sure they do things the "right way."
Reusable workflows in GitHub Actions are workflows that you can define once and then call from other workflows across your repositories or in the same repository. This helps you avoid duplicating logic, makes maintenance easier, and fosters consistency for CI/CD pipelines.
Dispatchable workflows in GitHub Actions are workflows that can be manually triggered using the workflow_dispatch event. This feature enables you to run a workflow on demand via the GitHub UI or API, rather than waiting for a push, PR, or scheduled event.
In CodeCargo, a Self-Service Workflow has two key components:
- We create a GitHub Dispatchable Workflow in your project repository and configure it to call your GitHub Reusable Workflow
- We help you create a simple form for your users to specify input parameters for the SSW
This makes it super easy for your users to execute your existing GitHub Reusable Workflows - it's just a simple form that you configure and that's it! Here's the step-by-step process that explains how to do it:
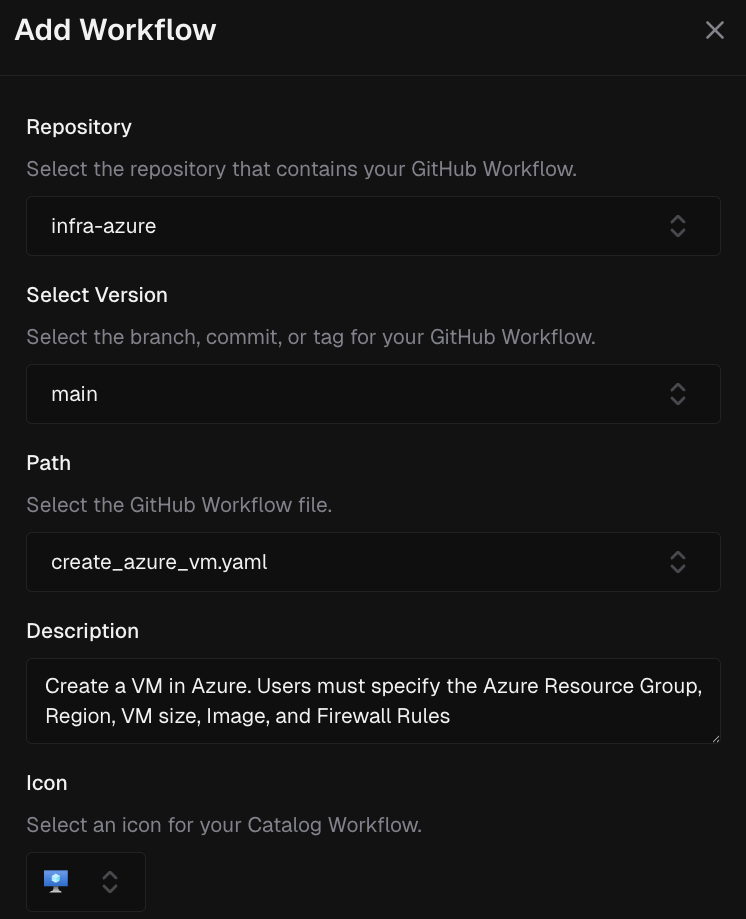
Step #1 - Import a Workflow to your Catalog
Step #2 - Create a Project (or use an Existing one)

When you create a Project, you must include at least 1 Git repository. This will define where we "install" your Self-Service Workflow. This is useful if you want your workflow to reference particular code.
For example, let's say that you want to create an SSW to deploy a VM to Azure based on Terraform. That Terraform file must exist somewhere - make sure you add the Git repository where the Terraform file is located in the project. And don't worry, if you forget, you can always add it later.
Step #3 - Create and Configure the SSW

After that, you can select if you want the platform to checkout code from a particular repo. Select this option if your GitHub Reusable Workflow requires code from your repository, such as a Terraform file.
Finally, it's time to configure the SSW inputs for your users. We render the user form in the middle of the screen. For each input, you can select:
Value Type
This defines how the input receives a value. You can select "user input" which allows the user to provide a value. You can select "fixed value" and then you'll provide input and the user will never know this input field exists.
Has Default Value
If selected, you must provide a default value for this input field. This makes the input optional for the user. If the user does not provide a value for this input, then we will automatically submit the default value when executing your GitHub Reusable Workflow.
Restrict Choices
This allows the user to provide a value from a set of pre-approved choices. It will create a dropdown list that the user selects from when running the form.
Any workflow input that you set to fixed value will be transparent to the user. When the user triggers the SSW, they won't even know the input exists. Whatever value you enter will be sent to GitHub for execution.
Step #4 - Run the SSW

What's Next?
Self-Service is the first step towards providing a streamlined developer experience. In my next post, I'll walk through our GenAI Workflow Editor. This will "close the loop" and show you how to use our platform to create a secure and compliant workflow, then provide that as a self-service function to your users.
C
CodeCargo Team
The CodeCargo team writes about GitHub workflow automation, developer productivity, and DevOps best practices.